Sample Tab
Overview
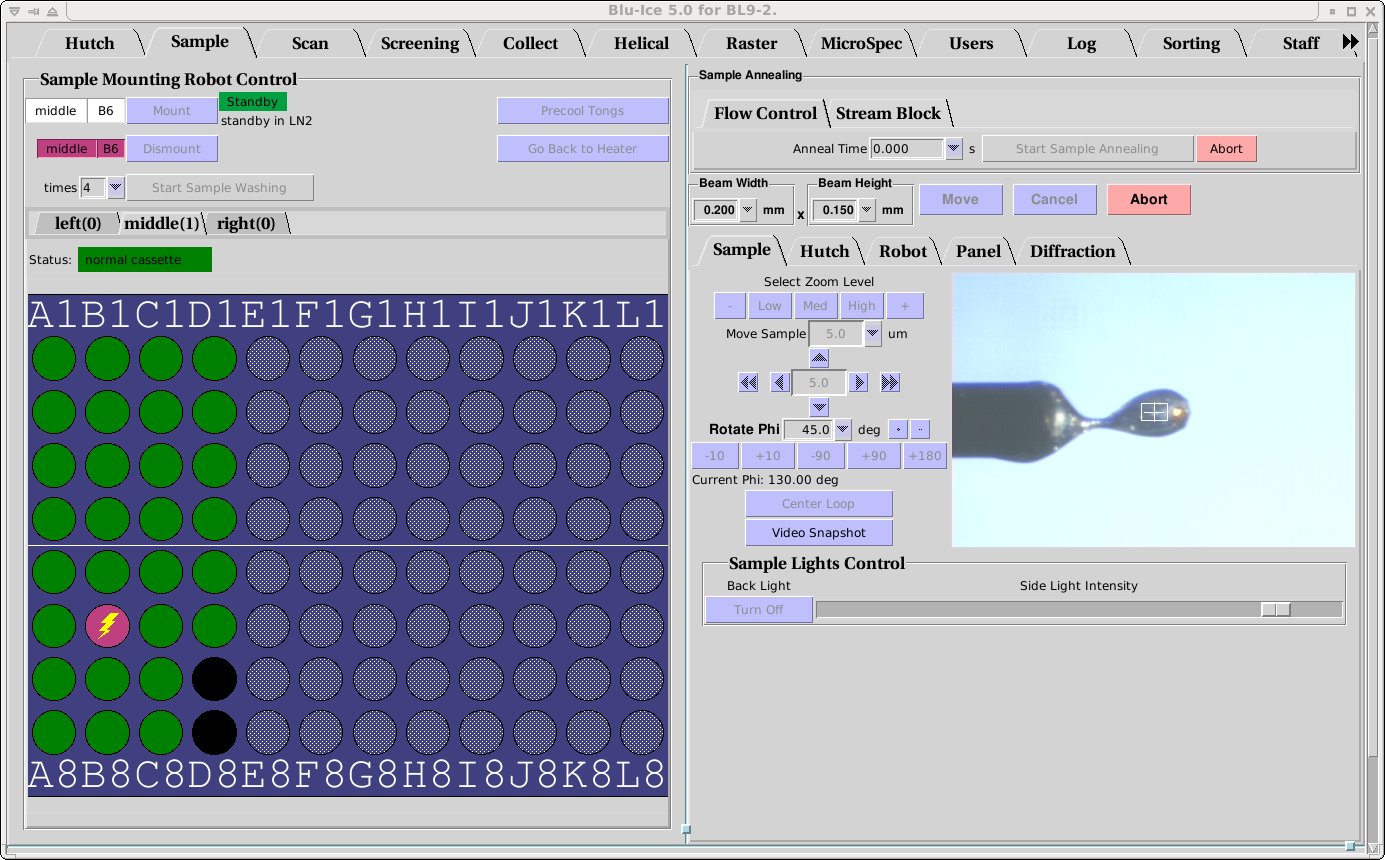
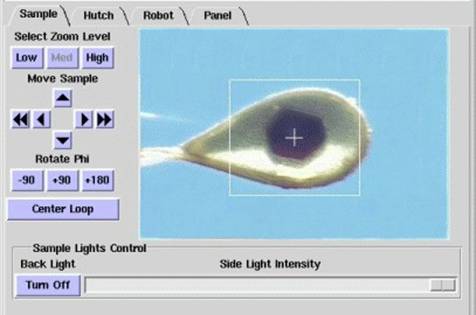
The Sample Tab allows the user to prepare the sample for data collection: The user can change the sample camera zoom and adjust the sample position, change the beam size , mount and dismount additional samples with the SAM robot, remove ice, and anneal the crystal.
Mounting the Crystal
Manual Mounting
 |
- General directions for mounting a crystal in a cryoloop can be found in this slide show.
- Move the detector and beamstop away from the sample for
easy mounting. On BL12-2 make sure that the on-axis
camera back-light is removed, by selecting the "On-Axis"
Sample camera video and clicking the Remove button under "Sample
Lights Control". Please do not attempt to adjust the beam
stop manually.
- Practice mounting a pin with a blank loop on the goniometer to make sure your system is compatible with our coaxial cold stream. Contact Staff if you run in to any problems.
- Check that the cold stream is aligned correctly (nozzle to sample distance should be ~10mm).
- Mount your sample on the goniometer head.
- Use the resolution predictor
to calculate the optimal sample to detector and beamstop distance.
If you will be using the Stanford Automated Mounting (SAM) robot
for mounting your crystals, see either the Sample tab
or the Screening tab for further instructions.
|
 |
Mounting with the Robot Interface
- This interface on the Sample tab may be used to mount crystals
one at a time using the Stanford Automated Mounting (SAM)
robot. While it is more efficient to automatically mount and screen
samples with the the sample
screening, use of the sample tab allows remounting samples for
data collection without erasing previous screening results. The
Sample tab sample mounting is not connected with the sample
spreadsheet. The screening results from samples mounted from the
sample tab will not be saved.
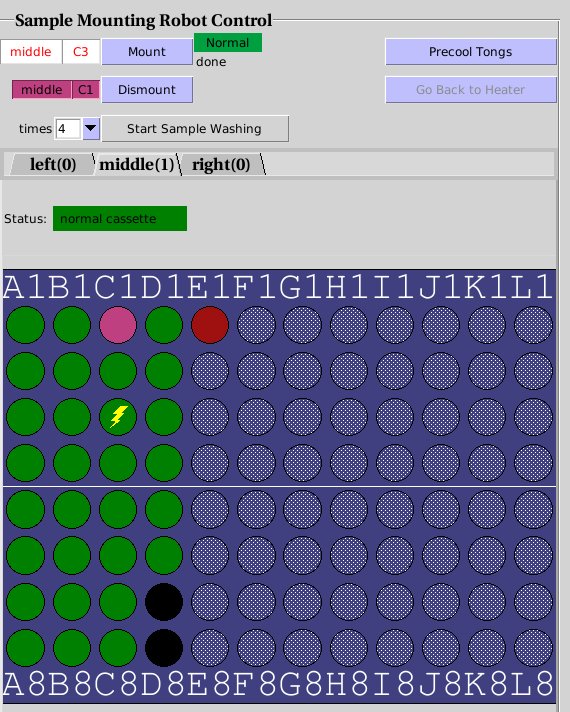
Sample Mounting Robot Control. The green ports hace a sample, D7
and D8 (black) are empty. E1 (red) is jammed and cannot be mounted. C1
(magenta) is currently mounted. C3 (zig-zag icon) will be mounted next.
The procedure for mounting and dismounting a crystal is:
- Precool the tongs using the top right button in the Sample
Mounting Robot Control Widget. This step is not strictly
necessary, since the robot will always cool the tongs if they are
warm before fetching a sample, but if you do this while you are
getting ready for the experiment, it will save you some time. If
the robot status to the right of the Mount button is "Standby",
the tongs are already cooled inside the sample storage dewar.
- Choose the correct position of your cassette (left, right or
middle) by selecting the correct tab above the table. Usually, the locations of the sample pins will be shown in
green, and the empty ports will be shown in black. A deep red port
indicates that it is jammed, and the robot cannot retrieve the
sample. Unprobed crystal locations in the table will be shown as grey circles. This means
that the robot does not know whether a pin exists in that location
or not. While this will not prevent you to mount the sample, some
robot error conditions cause a loss in the probing
information. Ask staff if you notice a grey port in a location
where you have samples.
- Select the crystal you wish to mount by clicking on the port
associated with its cassette location. The topmost box in the
interface, should now show disply the cassette position and the
crystal location to the left of the Mount button as shown
below left. Also, a yellow zig-zag line will appear over the
selected sample.
- Check that the robot status indicator to the night of the Mount
button shows green. If it shows "Busy" in yellow, the robot
is doing something (returning a sample, drying the tongs, etc) and
you will have to wait until the robot
returns to the ready state. If the status is displayed in red, it
means that there is an error. You will have to call User
Support.
- Click Mount and wait until the robot has
gone through the mounting procedure. The port will become light
green when the sample is in the dumbell magnet, and dark green when it
is in transit to the goniometer. Once the sample is mounted, the
port will turn magenta. At this point, ou can proceed to auto
centering (see below) and collect your data.
- If you want to speed up mounting of the next sample you can
"prefetch" it while the current sample is mounted. To do this,
simply click on the next sample you wish to mount. You will see
the yellow zig-zag icon on that sample. If the robot is idle in
standby, it will pull out the sample from the port and place it on
the magnet, until you click Mount. Note that manual prefetching
is not necessary in the screening tab. There, the next sample in the
selection list is always prefetched automatically.
- Each sample will be automatically dismounted every time you
mount a new sample. To dismount the last sample, use
the Dismount button.
Washing ice off the crystal with the robot
The crystal washing feature can be used to try to remove excessive ice from
the crystal once it is mounted and before you start data collection. The button for
crystal washing (see below left) is the third button in the Sample Automatic Mounting interface
and appears just under the indicators showing the crystals selected for
mounting and dismounting. During sample washing, the robot will dismount the crystal and place it back on
the dumbbell magnet in the dewar. It will then pick up the magnet and move the
sample in a circular motion and then up and down, before remounting it on the
goniometer. You choose how many time you want the crystal washed by using the times
pull-down menu (this does not mean the robot mounts and dismounts this many times,
it is simply how many times it goes through the circular/up-down motion in the dewar).
To start the washing process, press the Start Sample Washing button. The
button will initially turn red (as shown below right) and you will see the warning
Confirm may destroy sample. To activate washing, you need to click this
button a second time within 2 seconds, otherwise the button reverts back to the
grey Start Sample Washing button. This is to prevent accidentally initiating the sample washing.
You should be aware that it is possible to wash your crystal out of the
loop, particularly if you are using large loops with small crystals.
Use this feature at your own risk!
Sample Annealing
It is known that protein crystals have an underlying granular (or
mosaic) structure, giving rise to blocks of well-ordered crystalline
lattice which produce sharp diffraction peaks, surrounded by disrupted
water-rich regions which produce either diffuse scatter or no
diffraction at all. The size of these blocks becomes smaller when the
crystal is put under stress associated with flash-freezing
(predominantly due to the expansion of the bulk solvent in the solvent
channels) and this increase in microheterogeneity of the mosaic blocks
leads to an increase in crystal mosaicity and a reduction in
resolution and diffraction intensities. Crystal annealing, where the
temperature of the frozen crystal is either raised to just above the
freezing point of the cryoprotectant, or by several degrees but
without thawing, is a method which have been used successfully to
improve the diffraction quality of some flash-cooled crystals.
We have implemented one methods for crystal annealing into
Blu-ice, Flow Control that can be controlled remotely without
the need to enter the hutch.
Flow Control Annealing

In Flow Control annealing, the cold stream can be temporarily stopped for a certain length of time
specified by you. Only the cold stream is turned off, the outer dry nitrogen shroud remains on to protect
the crystal from icing. To use this type of annealing, make sure the
Flow Control tab is selected (this is the default upon first opening Blu-ice), select the annealing time using the anneal time
pull-down menu as shown above, then choose the length of
time you wish the cold stream to be off (the maximum time is 10 seconds but typically a time of
between 2-5 seconds is all that is required). To start the annealing process, press the
Start Sample Annealing button. The button will initially turn red (as shown below) and you will
see the warning Confirm may destroy sample. To activate annealing, you need to click
this button a second time within 2 seconds, otherwise the button reverts back to
the grey Start Sample Annealing button. This is to prevent accidentally annealing the crystal.

Use this feature at your own risk!
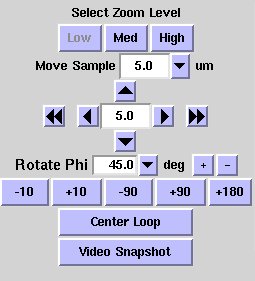
Crystal Centering
- Select the Sample tab on the video display. (Or
Sample profile on BL12-2).
- Select the zoom level Low to find the sample.
- Click on the sample to center it.
- Rotate phi 90 degrees by pressing the +90 or -90 button.
- Click on the sample once again to center.
- Select zoom level high.
- Repeat steps 2 to 4 to align the crystal accurately.
- If the crystal is difficult to see in some orientations, verify
that is stays a center at different values of phi. It is possible to
select different value by which to rotate the crystal from the drp
down menu Rotate Phi
|
|
-
If you want to hit the crystal in a very precise spot and you
cannot click on it accurately enough with the mouse you can use the
"Move Sample" buttons.
The double arrow buttons translate the sample
horizontally by half a screen. The single arrow buttons translate the
sample vertically or horizontally by the distance in
microns displayed in the center of the buttons; you can select a different
distance from the Move Sample drop down menu just above the buttons.
- On BL12-2, a high magnification on-axis camera is available
to align very small crystals. After roughly aligning the sample mount
using the Sample Profile view, use this camera by selecting the
Sample on Axis tab in the video widget.
Make sure that the back light screen (see Sample Lighting below) is inserted for a proper
sample illumination!
Auto Centering
- The sample can be quickly aligned by selecting Center Loop.

- This automated procedure sometimes fails if the lighting or
sample shape is abnormal.
- If the sample is asymmetric in the loop, a manual adjustment at
zoom level High may be required.
- Note: After auto centering is finished, the sample camera is not at the highest possible zoom level.
Adjusting Beam Size

- To adjust the beam size click on the windows labeled
Width and Height under the beam size label (see above). The white
box on the Hutch monitor gets updated automatically to the input
value. Like all other Blu-ice parameters, the color of this box becomes
red if the current value is not same as the value in the input box.
- With the exception of BL12-2, it is advisable to optimize the beam after changing the
beam size to a smaller size. Use the Optimize Beam button located under the
energy display to do this.
- Clicking on the units will open a drop down menu that allows
the units to be changed.
- The beam size displayed is approximately the Full Width Half
Maximum (FWHM) of the beam. Ideally the beam size should be the same
or somewhat larger than the crystal size.
- On BL12-2 the beam can be further collimated to a size of a few
microns, using the microcollimator check button.

Adjusting Sample Lighting
To address the needs of remote users, an improved sample visualization system has
been developed that provides remote control of the light intensity and direction.
With this new system, during automated loop centering the lighting is automatically
changed to the optimal settings for this process. Once loop centering is complete,
the lighting is returned to configurable default settings. These settings may be
adjusted using controls displayed in the Blu-ice GUI below.
back lighting (profile camera)
|
side lighting
|
both lights on
|
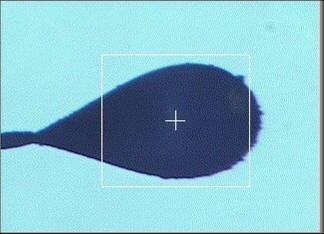
This sample illumination system consists of two light sources:
- Back lighting: a uniform back light, developed in house and composed of an
array of 81 ultra-bright LEDs. This light typically shows as a blue background.
With this lighting only, the loop is normally seen as a dark silhouette, as shown
above in the first image. This is optimal for automated loop
centering using the Center Loop button, or with automated loop centering used in
conjunction with automated sample screening (see the Screening tab for further instructions).
This light can either be switched on or off using the Back
Light button. On BL12-2, a screen can be inserted behind
the sample to provide back light illumination for the On-Axis
camera. This screen is automatically removed during data collection.
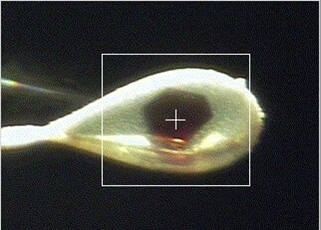
- Side lighting: a variable intensity side light comprised of an optical fiber
bundle connected to a Schott Fostec model DCRIII halogen source. This source is
directed at the crystal from an angle of 45 degrees, mounted above the X-ray beam.
With this lighting, the background is generally dark and the loop and crystal are
seen clearly, as shown in the second image above. The intensity of
this lighting can be adjusted using the Side Light Intensity slidebar as shown below.

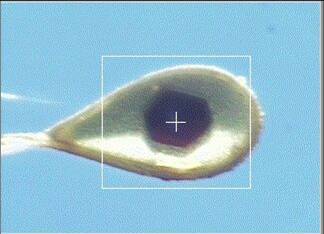
- The two lights can be used in conjunction, and the intensity of the side light
adjusted accordingly to provide optimum visualization of the crystal, as shown in the third image above.
|


