
|
Getting Started Using the Blu-Ice Control System
Starting Blu-IceThere are three possible ways to open Blu-Ice from the remote desktop on the NX client or from the beamline workstations:
A popup window will appear. 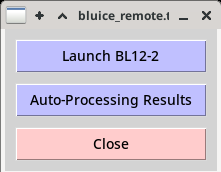
If a group is enabled on one or more beamlines, the beamlines will show up in the window. Clicjk on the beamline to launch Blu-Ice. If a group is supposed to be enabled and the beamline(s) do not show up, contect support staff. Previous auto-processing results can be viewed by selecting "Auto-Processing Results" which will open a standalone application. This is useful when users are off-line and they want to view previous auto-processing results. For more information see Viewing Previous Processing Results in the Processing tab. Also, if there are several people running the experiment from different locations, you may also provide your name and other contact information. See the User tab documentation Blu-Ice InterfaceThe Blu-Ice GUI is organized into tabs. Different functions of the software can be accessed by clicking on the tabs. Users are allowed to enter the Hutch, Sample, Collect , Raster, Screening, Sorting, Scan, Users Tab and Log Tab. Some beamlines have additional tabs to access special instrumentation or experiments. Some widgets (e.g., the beamline video widget, amongst others) can be accessed from several tabs.
Status BarThe status bar at the bottom of the screen shows the status of the software and beamline hardware.
The section on the left hand side shows one of three colours depending on the condition of the beamline:
The next indicator displays the Spear3 current (usually 500 mA or slightly below). A "Spear Closed" message in red, indicates that Spear has lost most or all of the current, or, if the current value is normal, that the beamline is closed due to a fault. You can call the SSRL Duty operator at 650 926 4040 for an update on Spear-related problems, or check the information in the Spear monitor at the beamline or on the Spear3 status page The Abort button allows the user to interrupt the current operation. All motor motion taking place at the time of the abort will be immediately interrupted before the motors have reached the final destination (except for the robot), so use this button with caution. Most Blu-Ice tabs have a "Stop"or "Pause" button which allows interrupting operations more cleanly. The "User" button is used to become the active client with permission to initiate experiments and move motors. Only one user at a time may be active, which prevents multiple users trying to move motors at the same time. This button is set to passive by default; clicking the button will then show "active" in red. The button will change to passive mode by clicking on it when it is active or when some other Blu-Ice instance becomes the active client. The final indicator on the status bar tells you whether the shutter is open or closed, and will display this during normal data collection or screening. By clicking on the button itself, you can toggle between open and closed but under normal circumstances this button should never be used during an experiment. The small black button rightmost in the panel will take a snapshot of the blu-Ice window and save it to your home directory as bluice_snapshot_'date'_'time'.jpg. This can be useful to record plots, a figure of the beamline status during data collection, etc. Message WindowThe message window just above the status bar displays detailed information regarding beamline control operations. This area can be enlarged by dragging the upper edge of this window with a mouse. For specific information about the experiment, see the Log tab. Summaries of fluorescence scans are also available from the scan tab. Log TabThe Log tab can be used to view and save a log of the experiment. The log displays the value of the detector and beamstop to sample distance, beam size and attenuation, energy, data collection mode and (for screening) the sample cassette spreadsheet name at the start of each screening or data collection run; it also lists the full path for each file generated during the experiment and the starting phi value for each diffraction image. Error messages are also displayed. To stop the log tab contents from scrolling during inspection, check the pause radio button at the top of the tab; clicking the refresh command button will update the contents of the log. Saving and Resetting the LogTo save the contents of the log tab to a file, click on the download command button. This will open a file browser window where you can select the directory and file name to store the log file. Trying to write the log to an existing file will result in an error, so that you cannot accidentally erase old logs. The log file is saved in ASCII format. To start a new log file, click on the new log button. This will clear the log tab contents and start a new log. If you do this by accident, you may ask the beamline support staff to retrieve the log contents for you. Beamline ReleaseAs of March, 2015, it's possible to notify SSRL staff that you are done using a beamline via buttons on the User Tab. There is also a text entry box to include a message to SSRL staff, if you wish to report a problem or request your samples be held on-site in long-term storage, for example. Finishing your experimentsReleasing a beamline can be done even while collecting a final dataset or finishing screening a series of samples. This allows you to plan your final experiments and schedule the release of the beamline, without having to wait for the final experiments to finish. Full details of the options are described on the User Tab page. Staff Tab |
|||
|
|
|||
| Technical questions: Webmaster
Content questions: Ana Gonzalez |
|||
| Last modified:Monday, 14-Jul-2025 16:39:37 PDT. | |||


