Table of Contents
Using the SSRL Automated Mounting (SAM)
system
SAM is a completely integrated hardware and software system for robotically
mounting and dismounting protein crystals at cryogenic or non-cryogenic, controlled-humidity conditions,
including support for autonomous screening and data collection. SAM is installed on all of the SSRL
macromolecular crystallography beam lines and is seamlessly integrated
into the beamline control and data analysis software.
In 2014, the system was upgraded for faster operation. The screening sequence (comprising crystal
mounting, automatic sample loop centering in the x-ray beam, video and
diffraction image acquisition, and
dismounting) may take less than
one minute per crystal. All diffraction images are analyzed for
resolution and diffraction quality on-the-fly (~10 ms per image). New images are autoindexed and
and datasets processed automatically with results viewable in the processing tab of the Blu-ice control software.
In 2020, we began supporting remote experiments using samples at controlled non-cryogenic temperatures or controlled-humidity conditions .
This includes support for remote controlled dehydraton experiments to optimize diffraction resolution.
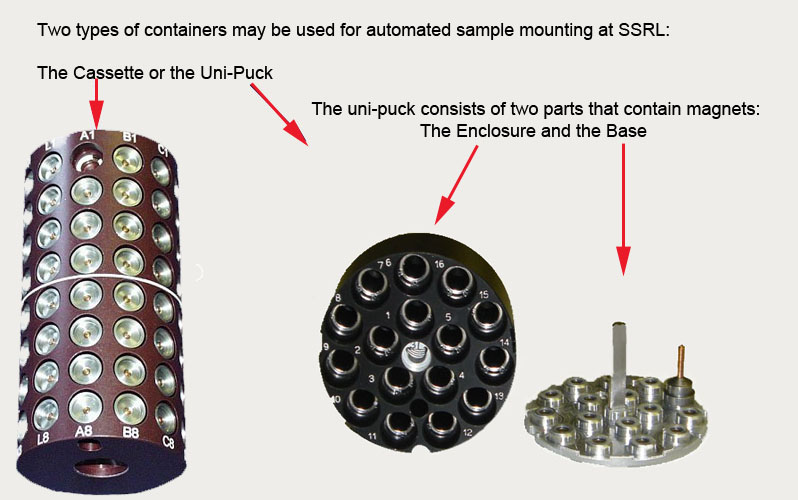
Samples may be stored in either SSRL cassettes or
Uni-Pucks for use with SAM. If you are scheduled beam
time with use of the robot sample mounting system, a cassette kit will
be lent to you.
The following sections describe how to prepare your crystals for
data collection using the SSRL robotic sample mounting system. Follow
these instructions to prepare the sample pins, mount
them in an SSRL cassette or Uni-Puck and ship them to the SSRL.
For additional information on the SAM system, see also the guide to
automated sample
screening. There are also
video tutorials
illustrating the sample preparation, sample container loading using SSRL cassettes, and Unipucks and use of the SAM system for data collection.
For
information about the cassette kit tools, including drawings and
vendor information, see the SAM hardware web
pages
Figure 8:
The two types of container for automated sample mounting at SSRL
|
|
Sample pin selection and preparation
To have a successful experiment proper sample pin preparation is
essential. The majority of problems we have observed with SAM have
been related to use of improper sample pins. To avoid these problems
please read the following directions.
Compatible
Hampton-style sample pins may be purchased from a number
of vendors including Hampton
Research,
MiTeGen, Crystal
Positioning Systems
or
Molecular Dimensions.
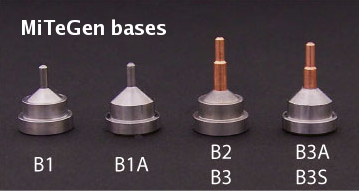
If sample pins are purchased from MiTeGen, use the B1, B1A or
B3S
with the 18mm
MicroMounts, MicroLoops, MicroMeshes or MicroGrippers. The B1, B1A, B3A and B3
bases can also be used with 19 mm mounts. The older B2 base can be used with
11 mm Micromounts and 10 mm nylon loop mounts. Please note that the
SSRL loop-centering routine, based on visual analysis, is not yet optimized for use
with the MiTeGen MicroMount, these mounts, as well as the loops are
well suited for
rastering. SPINE-standard pins can now be used with
SAM.
Figure 10:
Commonly available pin types
|
|
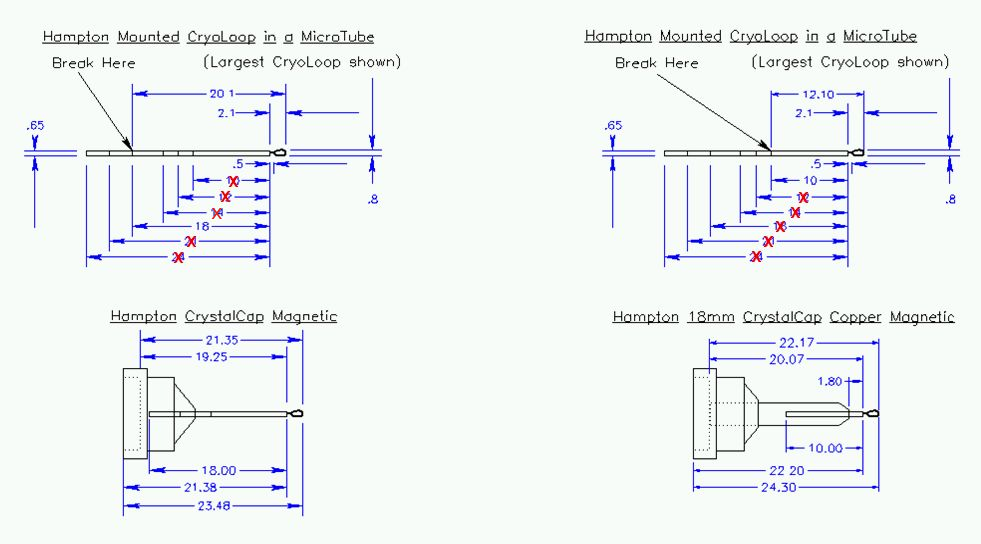
The allowed pins
sizes are 16 or 18 mm. The 18 mm size copper pin
is preferred.
Figure 9:
Preferred size of pin. Hampton cryo-loops should be cut at
the segment closest to the loop for use with the CrystalCap Copper pin
bases, provided with the cassette kits. Do not exceed the maximum
MicroTube length shown in the diagram! Unacceptable lengths are
marked with a red x. The 11 mm MiTeGen Micromounts and meshes should
be used with the CrystalCap Copper pin base; longer Micromounts
will need to be cut to the proper length before inserting into this pin
base.
|
|
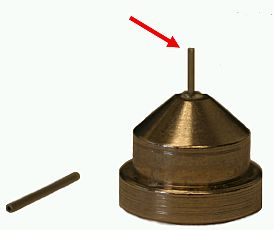
We recommend using Hampton-style Copper Magnetic pins because no laser
etched lines are exposed. These are the pins supplied with the
cassette kit. The microtubes used with Magnetic pins can
sometimes break off if bumped.
Figure 11:
Broken microtubes used with Magnetic pins can make the pin
jam inside the cassette port, stopping the robot.
|
|
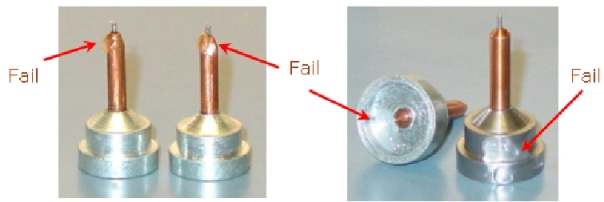
Microtubes should be affixed inside sample pins using epoxy.
Any epoxy with a curing time between 5 minutes and 24 hours should
work well for this purpose. We have found that superglue and superglue
gel is less reliable than epoxy for affixing microtubes. A number of
failures with the SAM system have been attributed to using other types
of adhesives on sample pins such as wax, nail polish, and Duco cement.
These should not be used.
Figure 12:
Use Epoxy to affix the microtubes to the sample pins. Glues
other than Epoxy have been observed to cause sample mounting
errors.
|
|
If an adhesive other than Epoxy has been used to affix the
microtubes to your sample pins, please let your user-support person
know in advance of using them. These pins may cause problems with
SAM.
Be careful not to use pins with excess epoxy on the pin base or
postpin-excess and do not get grease or excess cryo-protectant on the pin body.
At liquid nitrogen temperatures, grease from crystallization trays
gets rock hard. If you continually reuse your pins, please also
inspect them for corrosion and loose microtubes. Anything that changes
the outside form factor of the sample pin could cause the pin not to fit properly in the SAM robot tongs.
Warning: Do not use pins with excess epoxy on the copper post.
If you would like to mark your sample pins different colors, use
permanent marker for this purpose. Paint or nail polish should not be
used as this can change the form-factor of the pin or be sticky.
Hampton Research now sells a new pre-assembled Copper Magnetic sample
pin (catalog number HR5-112) which is already color coded according to
the size of the nylon loop attached. It also has an alpha numeric
code and bar code.
All pins must be tested to ensure they fall within the allowed
tolerances. We have found some irregular pins that if used would
damage the SSRL sample mounting system. To test your pins, place them
on the end of the Pin Tester magnetic tool on the red line.
Only use pins that completely cover the red mark without forcing. Pins
that fail this test should not be used!
Figure 13:
Use this tool (included with the SAM kit) to test all your
pins before use with the SAM robot
|
|
Broken micro-tubes and torn nylon loops are usually a result of
mishandling sample pins in preparation for reuse. In particular pins
should not be piled together in a container when washing and drying
them. To wash pins, place them individually on a magnetic tray. Hang
the tray upside down to dry the pins. It is important to store your
sample pins in a safe place when they are not in use. The
microtube storage rack is a useful storage location for extra pins.
Figure 14:
Storing pins for re-use.
|
|
If you
are scheduled beamtime with use of the robot sample mounting system, a
cassette kit will be lent to
you.
Figure 15:
Cassette Kit: (A) Sample Cassette and 96 Hampton pins
(microtubes and loops not included) (B) Dewar Canister - replaces
stock canister in dry shipping dewars (C) Teflon Ring - to support the
canister in the shipping dewar (D) Transfer Handle - for transferring
cold cassettes (E) Magnet Tool - to mount pins in cassette and to the
test size of pins (F) Guide Tool - to aid in mounting pins into cassettes
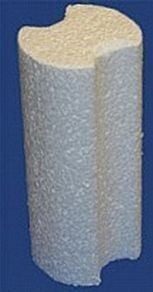
with the magnetic tool (G) Styrofoam Spacer - to keep the cassette in
place when shipping one cassette; not shown: A dewar for mounting
crystals into the cassette.
|
|
The cassette contains 96 sample ports each port contains a ring
magnet which holds in the sample pin. A cutaway view of the cassette
is shown below. The ring magnets are shown
in green. The magnets are held in place by a polycarbonate washer
shown in white. The washers are removable so any broken ring magnets
may be replaced.
Figure 16:
Cassette diagram. The ring magnets are shown in green and the
washers holding the magnet are shown in white
|
|
Cassettes should not be stored where magnetic debris
can get inside the ports. Before using your cassette, it should be
inspected to ensure the ports are all empty.
The transfer handle is used to safely transport cold cassettes.
To attach the transfer handle (D) to a sample cassette
(A) first place the locking pins into the slots
at the top of the cassette. Then push down the handle, and rotate
clockwise until the handle locks in place.
Figure 17:
Attaching transfer handle to
cassette
|
|
The slotted guide tool consists of a long
magnetic wand with two slots in the middle and a loading guide with a track on the handle
that accommodates the slots on the wand tool. To flash freeze samples,
the wand may be inserted into the top of the loading guide. To
transfer pre-frozen samples it is important to keep the samples at
liquid nitrogen temperatures during transport into the cassette. The
wand should be inserted from the side of the slotted guide tool to
keep the sample under liquid nitrogen during transfer. Use the slot
closest to the red (or maroon) side of wand (weak magnet) for loading
samples.
When unloading samples the wand is turned around and the
opposite slot and stronger magnet is used.
The circular cutout in the loading dewar may be used to hold
samples in cryo-vials or pucks for transfer.
The most common problems we see observe with cassette loading is the
accumulation of ice in the liquid nitrogen bath. Ice will stick to
your sample as it is transferred through the liquid nitrogen on the
way to the cassette port. It can also fall inside the cassette ports.
If excess ice is observed in the bath, the cassette should be stored
in a cold dry-shipping dewar and the loading dewar emptied, dried and
refilled with liquid nitrogen before proceeding.
Important: To prevent ice from
accumulating in the liquid nitrogen, the cassette should not be stored
in the loading dewar for more than 20 minutes without exchanging
the liquid nitrogen.
To avoid ice accumulation, it may be useful to
to load cassettes under a fume hood or a dry box (as an example, see
a description of Nham Nguyen's setup at
http://smb.slac.stanford.edu/facilities/hardware/cassette_kit/Ice
free_Nham.pdf).
If not using a fume hood or a dry box,
cover the dewar with the lid when you are not mounting crystals.
To prevent ice from falling into empty cassette ports, some users
advise filling empty ports with blank pins. Each blank pin is removed
just before inserting a sample pin into the port.
Important: Please read the safety notes before
working with liquid nitrogen and make sure you are familiar with the
liquid nitrogen safety procedures at your institution.
- The custom foam dewar should be filled up to the
internal indicator ledge This takes
about 4 Liters of liquid nitrogen; it will be necessary to top off the
liquid nitrogen level after inserting a warm cassette.
Figure 19:
Filling the custom foam dewar
|
|
- Once the dewar is filled and equilibrated, place the cassette
in the dewar and tilt the transfer handle until it rests inside the
side notch. Then push the cassette
forward until the bottom of the cassette is
touching the edge of the dewar.
- The guide tool may be pre-cooled on the side dewar
shelf. To prevent condensation on the metal
portions of the guide, it may be stored on the shelf between loading
samples.
Figure 20:
a. Placing the cassette in the foam dewar. b. Storing the guide tool.
|
|
- Rotate the sample cassette with the transfer
handle to access the desired cassette
port.
- Place the guide tool (F) on the
cassette centered on the port.
Figure 21:
a. Placing the guide tool into the cassette. b.
Putting the pin on magnet tool. c. Picking the
crystal.
|
|
- To flash freeze a sample:
- Put a pin onto the red side of the magnet tool (E)
and pick up a crystal.
- Flash-freeze the crystal by placing the pin
through the handle of guide tool and into the cassette port,
minimizing the time the crystal is in the air.
Figure 22:
Flash freezing the crystal
|
|
- To transfer a pre-frozen sample from a vial (or puck):
- Tilt the vial and use the red side of the magnetic wand tool
to remove the sample pin. Be careful to keep the sample under
liquid nitrogen at all times. (Vials or pucks may be placed in the
round cutout inside the dewar.)
Figure 23:
a. Placing the guide on the cassette. b. Picking
the pin. c. Transferring the pin
|
|
- Slide the lower slot of the magnetic wand tool into the guide
tool while keeping the sample under liquid nitrogen.
Figure 24:
Using the guide slot under liquid nitrogen.
|
|
- Once the magnetic wand tool is in the center of the guide
tool, the wand tool may be pressed against the back of the guide
and pushed downward placing the pin into the port. (It is
sometimes helpful to rotate the wand while it is pushed down to
break any ice that may have formed between the magnetic wand tool
and sample pin.) The magnetic tool may then be pulled up, removed
and the next sample transferred.
Important: It is strongly recommended to test the shipping
dewar
prior to shipping samples to make sure that the samples will be kept cold before
arrival.
For information about loading and shipping samples in the Uni-Puck
see:
http://smb.slac.stanford.edu/facilities/hardware/cryotools/Uni-puck/Uni-puck_Directions.pdf
Important: It is strongly recommended to test the shipping
dewar
prior to shipping samples to make sure that the samples will be kept cold before
arrival.
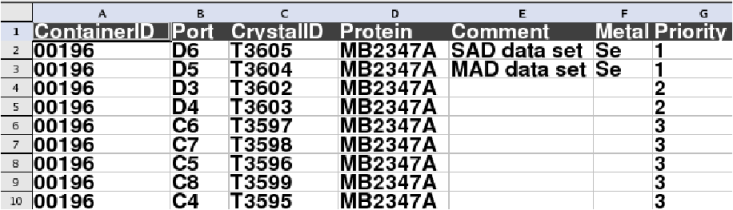
Storing sample information: The Excel spreadsheet
Sample information is entered into a Excel spreadsheet file. The
spreadsheet has a specific format for use with the SSRL Sample
Database and data collection applications.
The following instructions explain how to download, fill up and
upload a spreadsheet.
- You can download a spreadsheet template for the SSRL cassette, Uni-puck adapter (holding up to four pucks) or SSRL plate from the SSRL Sample Database (New Spreadsheet tab).
If your browser cannot
display Excel spreadsheets, click the Save to file button in the
pop-up menu; navigate in the dialog box to the directory of choice and
click Save.
- Type in the information for the samples in the cassette. Important:
Make sure that ''text'' format is used.
- If you are sending more than one cassettes, use one spreadsheet per
cassette. The Uni-puck spreadsheet holds information for four pucks
(labeled A, B, C and D).
Figure 26:
Formatted Screening System Excel Template.
|
|
See also information on editing the spreadsheet.
Uploading an Excel spreadsheet
Uploading the spreadsheet from a Web browser
Once the Excel spreadsheet has been filled out it can be transferred
to the Sample Database at the URL:
http://smb.slac.stanford.edu/crystal-server/
- Log in to the database interface using your account name and
password. You also need cookies and javascript
enabled in your browser to log in and upload the spreadsheet
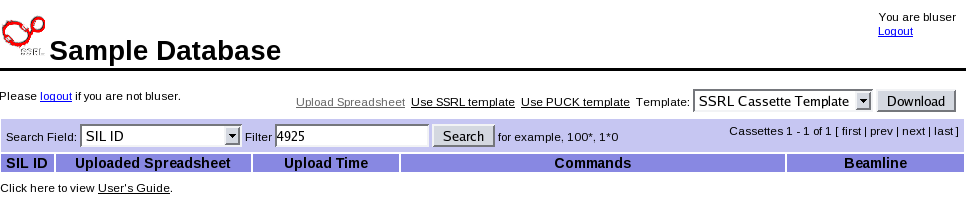
- Once you are logged into the system you should see the page
shown below.
Figure 27:
The Sample Database interface.
|
|
- Click on
Upload Spreadsheet. You will be directed to the Upload
Excel File page.
- Enter the name of the spreadsheet (you will need the full
directory path, for example: /home/yourid/filename.xls) or click
on the Browse button to search for the file. If you have trouble
locating the file, verify that the filter for types of files is
*.* or *.xls in the Choose File dialog box. Once the file
is located in the dialog box, select Open.
- Enter the Cassette number in the Cassette Pin box. If the Excel
file does not contain a ContainerID, it will be generated and
assigned the value you enter. On the other hand, if the spreadsheet
already contains a ContainerID, the value you enter here will be ignored.
Do not modify the default Spreadsheet name unless you changed it
in your Excel file.
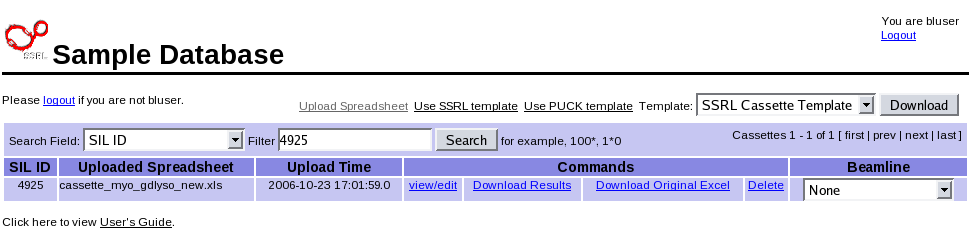
- To finish
uploading the file to the Database, click Upload. If your
spreadsheet is not in a standard format (e.g., empty or duplicated
CrystalID, no ContainerID) the interface will apply and
display the necessary corrections in a separate page. Scroll to the
bottom of this page and click on Display Cassettes. This will
take you back to the home page, displaying the new spreadsheet
entry.
Figure 28:
Uploaded spreadsheet information.
|
|
- To
screen more than one cassette, click on "Create New Entry" again and upload
the corresponding spreadsheet, etc.
- Entries can be removed from the database by clicking
Delete entry.
Important: If you do not wish to fill up the spreadsheet, it is possible to
use a Default Spreadsheet.
Uploading the spreadsheet from Blu-Ice
Once you beamtime has started and you have been enabled to start
the experiment, it is possible to access the Sample Database directly from
the
screening
tab in Blu-Ice:
Clicking the Web button will
launch a web browser and you can upload the file as described in the
previous section.
Assigning the Excel spreadsheet to a
beamline
The information in the database may be assigned to a
beamline once beamline access has been permitted. On the
Sample Database page, the last entry (Beamline column) is used to assign the Excel spreadsheet to a
particular beamline or to a particular cassette location. A total of 3
cassettes can be placed in the cassette storage dewar and are labeled
'left', 'middle' and 'right'. Select the appropriate position (staff
will let you know which one to use) and
beamline by using the drop down menu. If the assignment fails, ask
the support staff to verify that your account has beamline access.
The spreadsheet assignment can also be done directly from Blu-Ice
using the Cassette drop-down menu.
Using the Default spreadsheet
Sample screening without a spreadsheet is possible, but the
results of the screening will not be saved. To avoid this problem,
log in to the Sample Database interface as described above and click
Use Default Spreadsheet. Select the cassette type (SSRL or Puck
adapter), type in the cassette number if known and click
Submit. A cassette named cassette_template.xls will appear in
your spreadsheet list. The spreadsheet can be assigned to a beamline
and dewar position as usual.
Editing the spreadsheet
The easiest way to make extensive changes to an uploaded
Excel spreadsheet is to download the file to the local computer,
then edit it and upload the modified file as explained in the
previous section. The link Download Original Excel
file can be used to retrieve the original uploaded file, without any
edits or results. If you wish to modify the file after screening
results are available, use the Download Results link instead.
You can edit the Excel file on the Unix beamline computer with the
LibreOffice software. To run LibreOffice from the beamline
computers type:
% libreoffice filename.xls
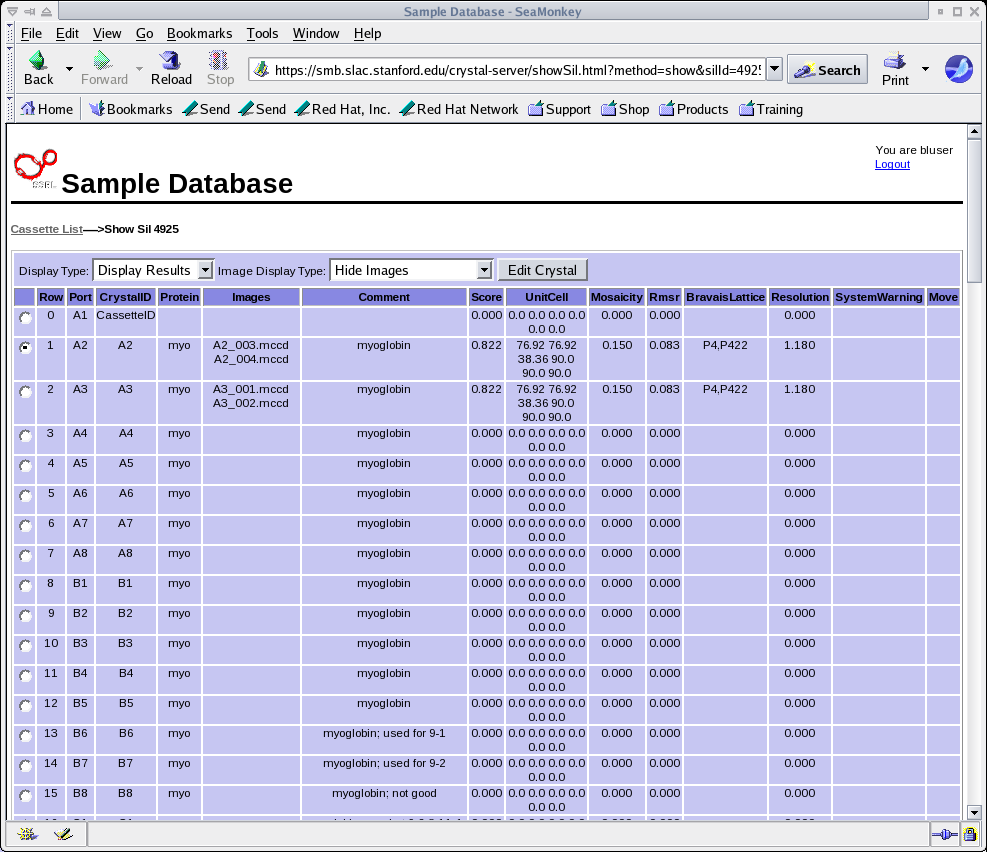
It is also possible to edit selected fields for a sample
by clicking on View/Edit. This displays an HTML version
of the spreadsheet
Figure 29:
Editable HTML version of the spreadsheet.
|
|
- Check the Port containing the sample you wish to edit
- Click on the Edit Crystal button on top of the
spreadsheet.
- Edit the information in the field(s) of your choice
- Click on Save changes to save your edits or Cancel
to reset the old values.
- Download the modified spreadsheet to the local computer by clicking on
the Download Results link.
During the experiment, Blu-Ice can also be used to edit
selected fields. Consult the
Blu-Ice
documentation to find out how to edit the spreadsheet on these applications.
|

![\includegraphics[width=0.6\textwidth]{images/epoxy.ps}](img10.png)
![\includegraphics[width=0.6\textwidth]{images/glues.ps}](img11.png)


![\includegraphics[width=0.6\textwidth]{images/cassette-cutaway.ps}](img12.png)
![\includegraphics[width=0.8\textwidth]{images/p10.ps}](img18.png)
![\includegraphics[width=0.2\textwidth]{images/p16.ps}](img23.png)


![\includegraphics[width=0.8\textwidth]{images/p7.ps}](img13.png)
![\includegraphics[width=0.85\textwidth]{images/guide_tool.ps}](img14.png)
![\includegraphics[width=0.9\textwidth]{images/dewar_filling.ps}](img15.png)
![\includegraphics[width=0.4\textwidth]{images/foam_dewar.ps}](img16.png)
![\includegraphics[width=0.35\textwidth]{images/precool.ps}](img17.png)
![\includegraphics[width=0.2\textwidth]{images/p12.ps}](img19.png)
![\includegraphics[width=0.9\textwidth]{images/guide_dewar_placement.ps}](img20.png)
![\includegraphics[width=0.6\textwidth]{images/guide_slot.ps}](img21.png)
![\includegraphics[width=0.2\textwidth]{images/p15.ps}](img22.png)