
|
Data Backup, Access and TransferTable of ContentsBack to Macromolecular Crystallography Computer Environment OverviewWhile we attempt to store user data for as long as possible, currently data storage is not guaranteed. Individual user groups remain responsible for backing up all data immediately after their beam time. User support staff may access stored data collected on SSRL beamlines to provide training, advice and support to user researchers and to troubleshoot, improve and test automated algorithms. This page describes the data transfer options SSRL supports and how to use them for offsite data backup. If you feel there are other technologies that will be useful, please mention this in your "End Of Run Summary" and we will take your suggestions into consideration. Supported Backup Options
Transfer data over the network
OverviewTo transfer your experimental data from SSRL to your local machine, we require use of a file transfer program supporting secure transfer such as sftp or rsync. We recommend use of Filezilla. The use of an SSH key is required for authentication to our computing. To setup and use Filezilla with an SSH key, follow these instructions. For optimal performance, please use our dedicated data transfer server: smbcopy.slac.stanford.edu. This server is on a high-speed network and is optimized for data transfers without interfering with data collection or processing.
ExamplesExample 1: Using sftp to pull files to your local directory To copy all files matching a pattern (e.g., lyso_*.cbf) from your SSRL data directory to your current local directory: sftp user@smbcopy.slac.stanford.edu:/data/user/my_image_dir/lyso_*.cbf .Example 2: To recursively copy an entire directory with compression sftp -r -C user@smbcopy.slac.stanford.edu:/data/user/my_image_dir .Example 3: Using rsync to synchronize a remote SSRL directory with a local one rsync -auvP user@smbcopy.slac.stanford.edu:/data/user/my_data_dir/ ./my_data_dir/The first time you issue the command, everything in my_data_dir will be copied to remote_data_dir. If you repeat the command after collecting some more data only new or modified files will be transferred. Rsync works great for keeping two local directories in sync as well. See the section on using external disks below. Make sure that you have enough disk space to store all your data at the target location before you start the file transfer. To get the size of a directory in kilobytes use the command: du -sk dir_nameYou might want to compress your data before transferring to reduce the time. Especially files from analysis directory compress well, as do the image files from ADSC and mar CCD detectors. Files from the Pilatus detector in cbf format and files from the mar345 image plate scanner are already compressed. Commonly used compression programs are gzip and bzip2. The latter compress a little bit better at the expense of longer execution time. To compress all image files in your current directory type: gzip *.imgClient softwareThere are a lot of software available for doing network file transfers. For Unix/Linux, the command line tools like sftp and rsync are built into the OS, and are also available on MacOS. There is a GTK based GUI application, gftp, that is easy to use. For Windows/MacOS/Linux a good freeware client worth trying is FileZilla. There are also many commercial clients for the Windows platform. Backing up to locally connected disk device, FireWire (IEEE 1394) or USB.OverviewBacking up directly to a FireWire or USB connected hard disk is a very fast and convenient way to store data. It is relatively secure, provided that you have a second backup of the data as well. Make sure that it is not your only backup of your data. We support the use of the de facto standard Linux file systems ext2/ext3/ext4 or xfs, as well as Windows FAT32 file system. Please note that neither Windows NTFS nor Mac HFS can be used. Important issuesIf you use a FAT32 formatted file system there area a few important issues you need to know about. For data integrity we recommend that you use a Linux file system. But the portability of FAT32 makes it very attractive.
Connecting the driveThe Linux workstations at each beamline are configured to allow connecting an external hard disk via FireWire or USB. A cable labeled "FireWire" comes out of the console panel close to the monitor. The tool board has a spare FireWire and a USB cable that can be used with the workstations at the desk.
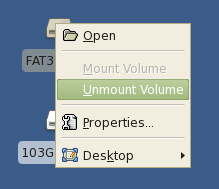
The name of the icon is same as the volume label if one exists, "FAT32_VOL" in the screenshot. An unlabeled volume will get an icon name that relates to the size of the volume. E.g. "103G Volume" in the screenshot. To mount the volume, right click on the icon and select "Mount Volume" from the drop down menu. The mount point for the labeled volume is /media/[Label], in this case the mount point would be /media/FAT32_VOLThe mount point for an unlabeled volume uses the following pattern, depending on how many unlabled volumes there are. /media/disk/media/disk2 ... If the desktop icon does not appear after connecting the disk, try disconnecting the cable and wait 15 seconds. Then connect the disk again. If you still have problems, contact support staff. Disconnecting the drive
To unmount, right click on the desktop icon for the mounted disk and select "Unmount Volume" from the drop down menu.
The cause of this error is almost always a process which "current working directory" is on the mounted filesystem. Go through your different terminal windows and type pwd to find the offending process. Transferring your filesTo copy your files over to the FireWire disk you can use one of the following commands. cp -auv /data/username/my_data_dir /media/disk/SSRL/rsync -auvP /data/username/my_data_dir /media/disk/SSRL/ Both of these commands will recursively copy all files in the specified directory, symbolic links will not be followed, and links will be preserved as links. If the command is used a second time, only new or modified files will be copied. If you don't want to have the listing scrolling down the screen, remove the "v" parameter from the command line. Important! If the external disk has a Windows FAT file system you must modify the rsync parameters like this to get reliable updates. rsync -rltuvP --modify-window=1 /data/username/my_data_dir /media/disk/SSRL/File permissionsWhen mounting a FAT32 file system, all files, old and new will have the ownership of the account that issues the mount command. They will be world readable and only writable by the owner. On a Linux file system, pre existing files will retain their ownership and permissions. This implies that before you bring your disk to SSRL, you must create a directory on the file system that is either owned by the same UID as your SSRL computer account, or there has to be a directory that is world writable. New files will have the same ownership and permissions as the account issuing the mount command. Note that to change ownership of the disk's top directory, root privileges is generally needed. |
||
|
|
||
| Technical questions:
Webmaster Content questions: |
||
| Last modified:Saturday, 22-Nov-2025 11:33:27 PST. | ||
 Before disconnecting the hard drive,
be sure to unmount all volumes on the disk. There is a real risk of
corrupting the file systems if disconnecting the cable while
writing.
Before disconnecting the hard drive,
be sure to unmount all volumes on the disk. There is a real risk of
corrupting the file systems if disconnecting the cable while
writing.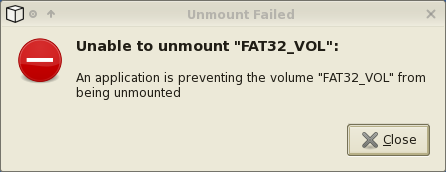 You may get this error message
when trying to unmount the volume.
You may get this error message
when trying to unmount the volume.