Basic (inference-only) intallation
Advanced (simulation-ready) installation
Simulate hitfinder training data for Eiger
Line-by-line install instructions for NERSC Perlmutter super cluster
These models were trained for ~1 Angstrom data collected on Pilatus 6M or Eiger 16M detectors:
# for predicting whether diffraction contains overlapping lattices
wget https://smb.slac.stanford.edu/~resonet/overlapping.nn  # archstring=res34

# for predicting per-shot resolution estimates
wget https://smb.slac.stanford.edu/~resonet/resolution.nn  # archstring=res50
Currently the models are loaded by resonet according to their resonet arch strings. Unfortunately, these are not currenty written to the .nn model files, so the arch strings must be supplied manually before loading (hence the res34 and res50 that accompany each of the above models).
For questions running the code, or with results, submit an issue here. For installation questions, submit an issue here.
These installation instructions are for those who just wish to download the resonet models and test them on synchrotron image files. Multi-panel detectors are technically supported, but no official script exists [yet] to handle them.
Resonet has many options for processing image data. It can use fabio or dxtbx to read images from disk, or it can handle arrays already in memory (for highest throughput). As an example, and to test a resonet install on your system, we provide a DXTBX-based script for processing images currently on disk.
To install and test this script, start by downloading and installing a conda environment :
wget https://repo.anaconda.com/miniconda/Miniconda3-latest-Linux-x86_64.sh
bash ./Miniconda3-latest-Linux-x86_64.sh -b -u -p $PWD/miniforge
source miniforge/etc/profile.d/conda.sh
With conda, install a DXTBX environment which will include a python build:
conda create -n reso
conda activate reso
conda install -c conda-forge dxtbx
With the dxtbx environment, install resonet. One must clone the Github repository, and install it locally:
# get the source code
git clone --recurse-submodules https://github.com/ssrl-px/resonet.git
cd resonet

# get the build module to build the software
python -m pip install build

# build and install with pip
python -m build
python -m pip install dist/resonet-0.1.tar.gz
With that, the build should be ready. If you have some CBF files lying around, test it as follows:
# launch the Pyro4 nameserver
python -m Pyro4.naming &

# launch the resonet image Eater
resonet-imgeater resolution.nn res50 &
#Rank 0 Initializing predictor
#Rank 0 is ready to consume images... (followed by a URI)
And then, with the imgeater actively waiting, pass some images to it using the script resonet-imgfeeder which sends glob strings to image eater. Use the arg --maxProc 5 to only process 5 images from the glob (for testing purposes, otherwise all images in the glob will be processed):
resonet-imgfeeder "/path/to/somewhere/*cbf" 1 --maxProc 5
# Example output:
#Rank0 T34DpactE2_2_00001.cbf Resolution estimate: 4.164 Angstrom. (1/1800)
#Rank0 T34DpactE2_2_00002.cbf Resolution estimate: 3.319 Angstrom. (2/1800)
#Rank0 T34DpactE2_2_00003.cbf Resolution estimate: 2.897 Angstrom. (3/1800)
#Rank0 T34DpactE2_2_00004.cbf Resolution estimate: 3.569 Angstrom. (4/1800)
#Rank0 T34DpactE2_2_00005.cbf Resolution estimate: 3.679 Angstrom. (5/1800)
#Done. Processed 5 / 1800 shots in total.
The second argument to resonet-imgfeeder is the number of processes running resonet-imgeater. For this tutorial it is just 1 process, however the resonet-imgeater can be called with mpirun (e.g., mpirun -n 8 resonet-imgeater), provided mpirun is available (via openmpi, for example), as well as an accompanying install of mpi4py. The simulation-ready build below comes with MPI and mpi4py installs ready-to-go.
The real benefit of resonet will come from running it in parallel (using e.g., MPI) and evaluating the resonet models on GPU devices, which requires a proper CUDA installation. You might need to fine-tune the PyTorch installation to match the CUDA version. In our experience, multiple processes can share the GPU device(s) in a combined MPI-GPU environment to get very high image throughput! Resonet is currently in-use at the SSRL macromolecular crystallography beamlines through the Python-based monitoring software, interceptor.
Note: this install is only necessary if one wishes to synthesize training data using simtbx. Create a simtbx environment as shown here. Then, with the environment active, install resonet:
git clone --recurse-submodules https://github.com/ssrl-px/resonet.git
cd resonet

# build and install with pip
python -m build
pip install dist/resonet-0.1.tar.gz
One will first need to download the simulation data files (2.3 GB):
resonet-getsimdata --md5Consider installing MPI for parallel processing:
mamba install -c conda-forge openmpi mpi4pyas well as CUDA Toolkit.
⚠️Be warned⚠️: if working on a compute cluster, one will likely need to load openmpi and cuda modules (module load openmpi cuda, or similar, highly dependent on the given cluster), before building simtbx and resonet. See here for an example.
Now, simulations can be run using:
resonet-simulate test_shots --nshot 10Note, if openmpi (or equivalent) and mpi4py are installed the above script can be invoked with mpirun (or srun if using SLURM).
mpirun -n 10 resonet-simulate test_shots --nshots 100 --ngpu 2
# or, if mpi is unavailable / uninstallable:
resonet-simulate test_shots --nshots 100 --ngpu 2 --njobs 10
The above command took ~70 seconds using 1x Nvidia A100 and 1x Nvidia V100 (not the --ngpu 2 which sets the number of devices per compute node), and an Intel(R) Xeon(R) Gold 6126. In parallel mode, each MPI-rank will write a unique output file, and these can be combined using:
resonet-mergefiles test_shots test_shots/master.h5This creates a master.h5 which can be passed directly to the training script (see below). Note, multiple resonet-simulate output folders can be combined into a single master file like so:
resonet-mergefiles test_shots1 test_shots2 test_shots3 tests_master.h5This is useful if running resonet-simulate multiple times in parallel on a cluster (just be careful with the random seeds to avoid generating the same training images).
Master files or individual compressed*.h5 files can be viewed interactively:
resonet-viewsims test_shots/master.h5
# or:
# resonet-viewsims test_shots/compressed0.h5
which produces something like
The script net.py has a lot of functionality, but is still under heavy development. Use it as follows:
resonet-train 100 test_shots/master.h5 test_opt --labelSel one_over_reso --useGeom --testRange 0 1000 --trainRange 1000 10000 --bs 64 --lr 0.01The first argument is the number of training epochs. The second argument is the input, and the third argument is the output folder where results and a log file will be written. Note, the first epoch is usually slower than the subsequent epochs.
One can plot the training progress:
resonet-plotloss test_opt/train.logLet's assume a model has been trained, and it is time to test its predictions for some images.
There are two simple scripts (resonet-imgeater, resonet-imgfeeder) supplied in the repository for testing models. These scripts use Pyro4 and MPI to for inter process communication. By exploring those scripts, one can hopefully design even more robust resonet frameworks.
First, one should launch resonet-imgeater. The eater can be launched as a single process, or with mpirun as multiple processes:
libtbx.python -m Pyro4.naming &
mpirun -n 8 resonet-imgeater /path/to/nety_ep100.nn res50 --gpu &
Note, both of the above jobs were launched in the background. Now, the eater process will remain active, while we use resonet-imgfeeder to send it images, in this case as python glob strings:
resonet-imgfeeder "/path/to/some/images/*cbf" 8where the second argument simply specifies the number of processes launched with resonet-imgeater. The eater will then write the inference results to STDOUT. Note, all images in the GLOB will be processed!
Here we show how to use a simulation build of resonet to create training data for a hit finder. For production use, one will likely want to work in an mpi/cuda environment with multiple GPUs and compute nodes available.
To generate hit-finder training data (with equally probable hits/misses), use resonet-simulate:
mpirun -n 5 resonet-simulate hitfinder_data --nshot 20 --geom eiger --randDist --randDistRange 100 300 --ngpu=1 --randHitsIf working on a mac, or without a GPU, consider adding (--nmos 1), which will only simulate one mosaic domain per shot to expedite runtime. The resonet-simulate command will create the folder hitfinder_data and populate it with compressed*.h5 files (one per mpi process). Combine the individual compressed*h5 files into a single, virtual hdf5 file:
resonet-mergefiles hitfinder_data hitfinder_data/master.h5This single file contains all of the data needed to train a hit finder. You can view the data using
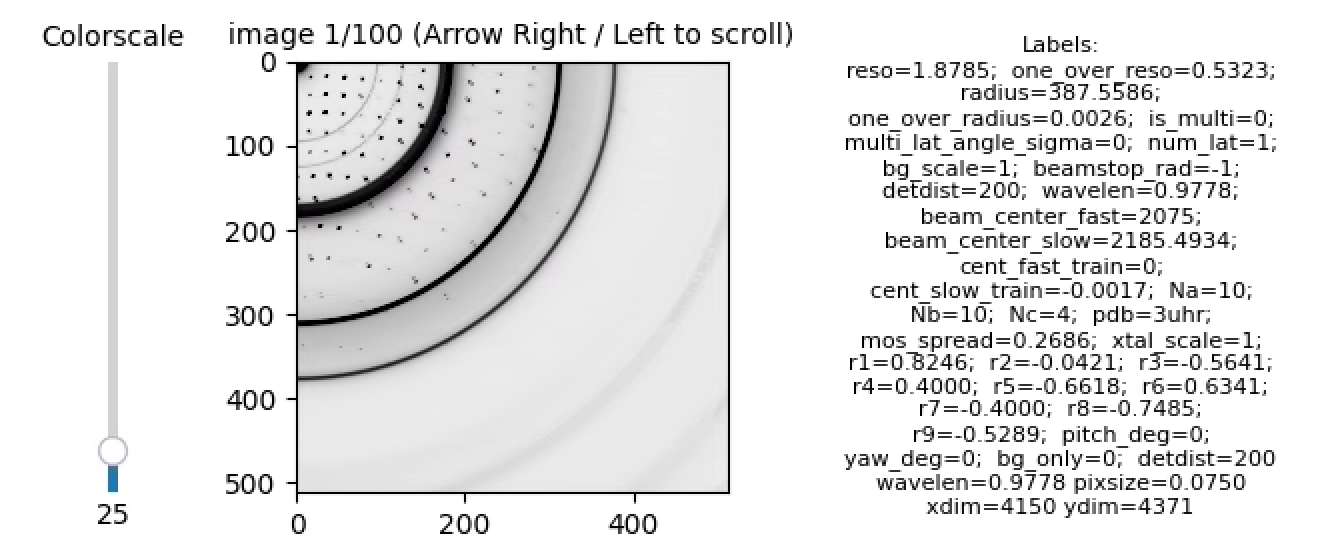
resonet-viewsims hitfinder_data/master.h5Use the arrow keys to page through the images, for example, here's a hit:
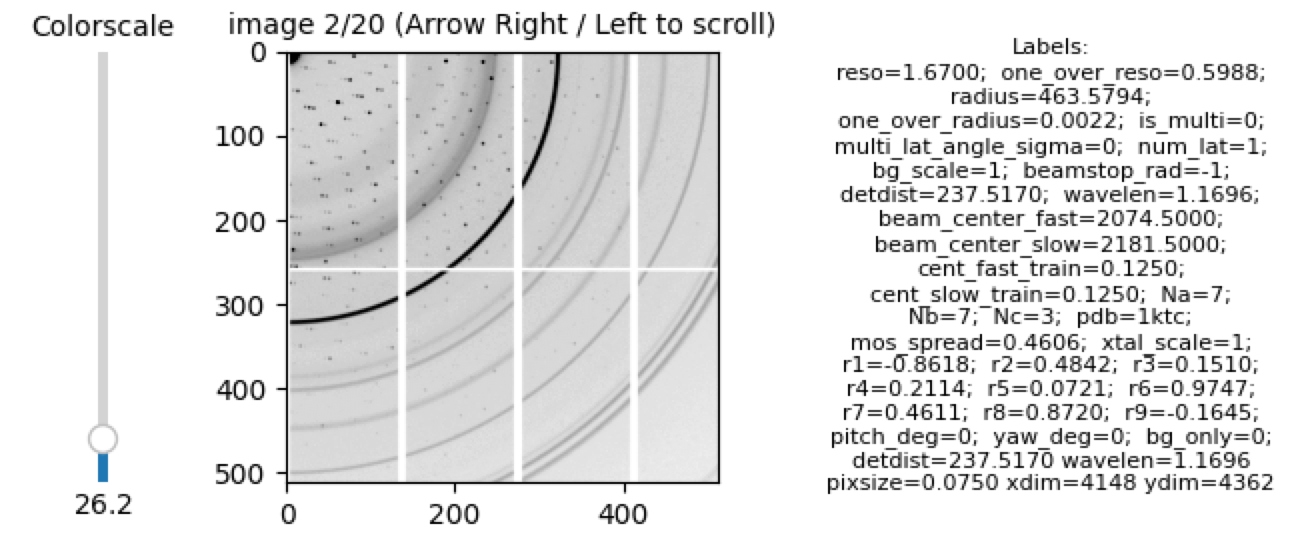
Note, from the labels, bg_only=0 indicates the image is a hit. Here is an example of a miss:
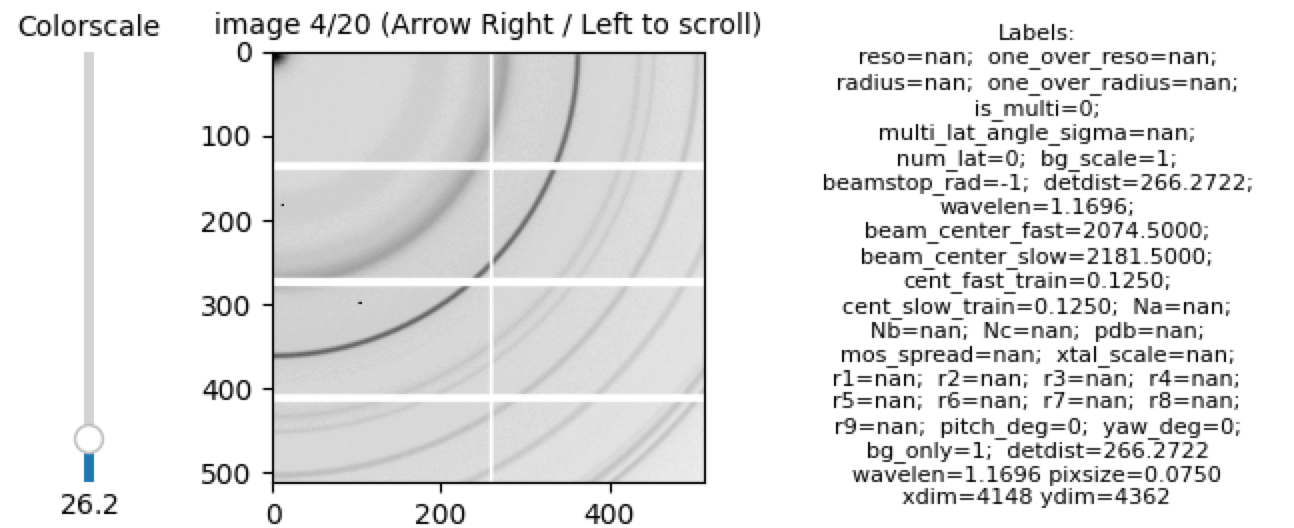
Here, bg_only=1. These labels can be used for training. Extract them in your own python application like so:
import h5py
h = h5py.File('hitfinder_data/master.h5', 'r')
imgs = h['images']
is_bg_idx = list(h['labels'].attrs['names']).index('bg_only')
bg_only = h['labels'][:, is_bg_idx]
is_hit = bg_only==0
is_miss = bg_only==1
nhit = is_hit.sum()
assert nhit + is_miss.sum()==imgs.shape[0]
To record a full-resolution CBF file for each event (which will increase the disk-usage significantly), add the --saveRaw option to resonet-simulate:
resonet-simulate hitfinder_data_wRaw --nshot 5 --geom eiger --randDist --randDistRange 100 300 --randHits --saveRawThe CBF files can be viewed using DIALS, provided one runs
mamba install conda-forge::dials
dials.image_viewer hitfinder_data_wRaw/cbfs0/*.cbf
The data within the files can be accessed using dxtbx:
import dxtbx
loader = dxtbx.load("hitfinder_data_wRaw/cbfs0/shot_1_00000.cbf")
img = loader.get_raw_data().as_numpy_array()
print(img.shape)
#(4362, 4148)Begin by connecting to Perlmutter
$ ssh perlmutter.nersc.govLoad the correct modules
$ module load PrgEnv-gnu cudatoolkit cpe-cuda
$ module list

Currently Loaded Modules:
  1) craype-x86-milan                        7) gpu/1.0                     13) craype/2.7.30          (c)
  2) libfabric/1.15.2.0                      8) cudatoolkit/12.2    (g)     14) gcc-native/12.3
  3) craype-network-ofi                      9) PrgEnv-gnu/8.5.0    (cpe)   15) perftools-base/23.12.0 (dev)
  4) xpmem/2.6.2-2.5_2.38__gd067c3f.shasta  10) cray-dsmml/0.2.2            16) cpe-cuda/23.12         (cpe)
  5) cpe/23.12                              11) cray-libsci/23.12.5 (math)
  6) craype-accel-nvidia80                  12) cray-mpich/8.1.28   (mpi)

  Where:
   g:     built for GPU
   mpi:   MPI Providers
   cpe:   Cray Programming Environment Modules
   math:  Mathematical libraries
   c:     Compiler
   dev:   Development Tools and Programming Languages
Install mamba and then the simtbx env. Build everything in the $SCRATCH folder
cd $SCRATCH
wget https://github.com/conda-forge/miniforge/releases/latest/download/Miniforge3-Linux-x86_64.sh
bash ./Miniforge3-Linux-x86_64.sh -b -u -p $PWD/simforge
source simforge/etc/profile.d/conda.sh
mamba create -n simtbx_mpi -c conda-forge cctbx-base libboost-devel libboost-python-devel dxtbx python=3.9 -y
conda activate simtbx_mpi
Install mpi4py using NERSC's MPI:
MPICC="cc -shared" pip install --force-reinstall --no-cache-dir --no-binary=mpi4py mpi4pyTest the mpi4py install by allocating a compute session, running a simple command, and exiting the allocation:
$ salloc -N 2  --tasks-per-node=3 --gpus-per-node=4 -A m4326_g -t 10 -q interactive -C gpu
# Do not re-load modules after allocating session, everything should be preserved

nid001233> python -c "import socket;from mpi4py import MPI;print(MPI.COMM_WORLD.rank, MPI.COMM_WORLD.size, socket.gethostname())"
0 1 nid001233
nid001233> srun -c2 python -c "import socket;from mpi4py import MPI;print(MPI.COMM_WORLD.rank, MPI.COMM_WORLD.size, socket.gethostname())"
2 6 nid001233
1 6 nid001233
0 6 nid001233
3 6 nid001236
4 6 nid001236
5 6 nid001236
nid001233> exit
Now that the env is good, download and build simtbx:
git clone --recurse-submodules https://github.com/pixel-modelers/easyBragg.git
cd easyBragg
cmake -B build_ext .
make -C build_ext -j8 install
pip install build
python -m build
pip install dist/simtbx-0.1.tar.gz
cd ..
And then download and build resonet
git clone --recurse-submodules https://github.com/ssrl-px/resonet.git
cd resonet
python -m build
pip install dist/resonet-0.1.tar.gz
resonet-getsimdata
And thats it! Test simulating 10,000 training examples on 4 compute nodes, 20 processes and 4x A100 GPUs per node (5 processes per GPU):
$ salloc -N 4  --tasks-per-node=20 --gpus-per-node=4 -A m4326_g -t 240 -q interactive -C gpu
salloc: Nodes nid[001028-001029,001032-001033] are ready for job

nid001028> srun -c2 resonet-simulate nersc_hitfinder_data --nshot 10000 --geom eiger  --randDist --randDistRange 100 300  --ngpu=4 --randHits
This took just under 30 minutes to simulate 10,000 images.
For each subsequent login to NERSC Perlmutter, create a resonet startup script which loads the env:
$ ssh perlmutter
$ source $HOME/resonet_startup.sh
where
# contents of $HOME/resonet_startup.sh :
module load PrgEnv-gnu cudatoolkit cpe-cuda
source $SCRATCH/simforge/etc/profile.d/conda.sh
conda activate simtbx_mpi
Only source $HOME/resonet_startup.sh once per login.