Installing and configuring NX Client.
This document briefly describes how to download and configure the
NX Client to enable remote access. For full documentation of the NX
client features, please consult the NoMachine site
A video
tutorial describing downloading, installation and configuration
of the NX client on a Windows XP machine is also available.
Download and installation
Download the NX client for your operating system from NoMachine. The client is
available as "click-to-install" packages for Windows and
Mac OS X. If you install on Windows, also download all the available
add-on fonts from the download page. Follow the installation
instructions provided on the NoMachine site. Linux packages are
available in "rpm" format for RedHat/Fedora and in
"deb" format for Debian/Ubuntu. A tar.gz package is also
available for an independent install.
Configure
- Windows: Double click on 'NX Client for
Windows' shortcut on your desktop. Or if you did not select to
have the shortcut, then you can find the "NX Client"
under Start -> All Programs -> NX Client for windows
-> NX Client for Windows
- Mac OS X: In the "Applications" folder,
click on "NX Client for OSX"
- Linux: type nxclient from a shell
window.
% nxclient
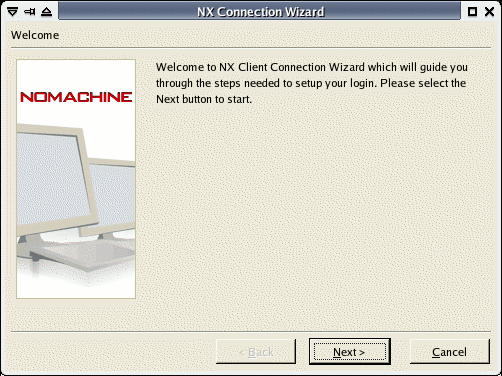
- The following window will appear when the NX Client
is started for the first time, click Next to
continue.
Follow these instructions to continue setting up NX client.
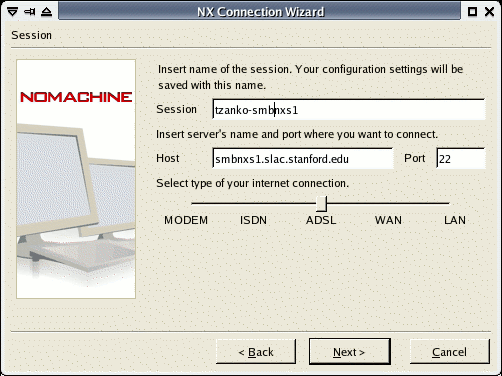
- Enter an mnemonic to use as Session name. We
recommend including the name of the server in the name (either
smbnxs1 or smbnxs2, see below) and, if several people will be using
the same account for simultaneous remote access, your own name.
Important! If two clients are using the
same account on the same server with the same session name , the
second client will steal the session from the first. Please make
sure you use unique session names if you connect from more than one
computer at the same time.
- Enter smbnxs1.slac.stanford.edu or
smbnxs2.slac.stanford.edu in the host field.
Tip: It can be useful to configure two different sessions,
one connecting to each server (so that you can easily try
connecting to the second one in case the first one is down).
- Modify the type of Internet connection you are using.
In practice the "ADSL" setting seems to work best even
when the actual connection speed is much faster.
- Click Next when finished.
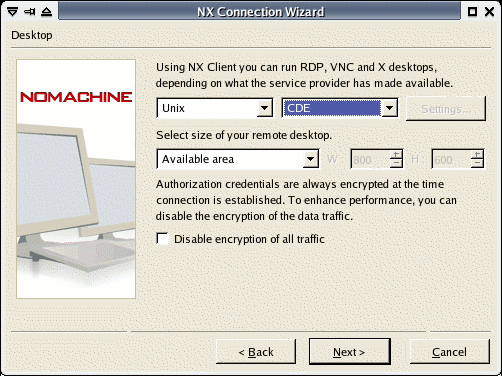
Window manager and other options.
- Select CDE as your window manager. Please
note that this will start our standard window manager called Xfce4
which has been customized for use with the Macromolecular
Crystallography Beamlines. Other window managers, Gnome and KDE,
are disabled.
- Do NOT disable the SSL encryption of all
traffic. If the session is not encrypted, connection will be
denied.
- Click Next when finished.
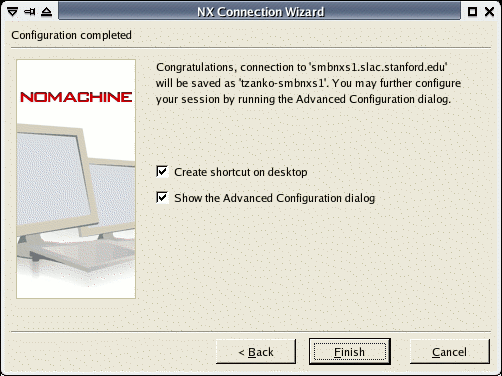
Shortcut and Advanced Options
- Check the Create shortcut on desktop if you
like having desktop shortcuts.
- Select Show the Advance Configuration
dialog, this will allow you to modify any of the above
settings, plus a few more esoteric ones before login if desired.
Then press Finish.
Post configuration
- The options that you may be interested in changing
are the Desktop size, Keyboard layout, font style and
size. The options available here differs slightly depending on
operating system.
- Change any configurations if desired and click
Ok .
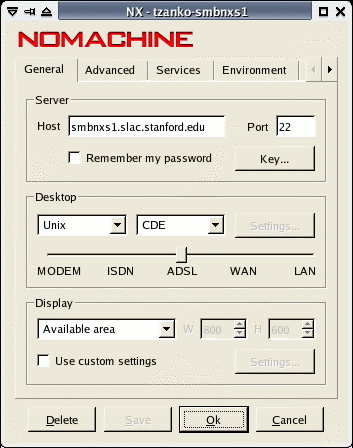
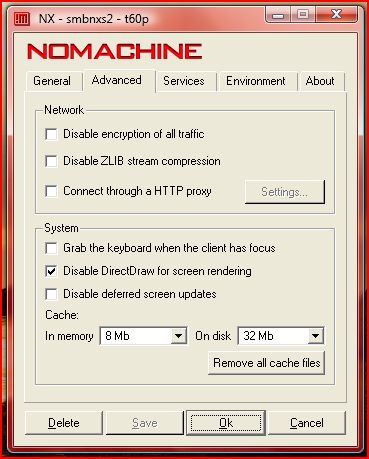
Extra configuration for Windows Vista
- If you are using Windows Vista and experience
problems with high CPU usage or a crashing NXwin.exe process,
follow the instructions below.
- Under the "Advanced" tab in the
configuration, check the box that disables DirectDraw for
rendering
Login
Login to SMB network
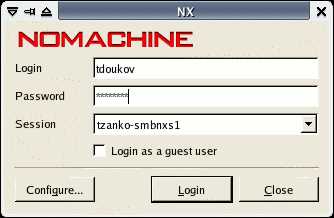
- Now you have finished configuring your NX client. The
following window will appear from now on when you start your NX
client.
- The login name and password must be the ones for your
SSRL SMB account. If you do not have an account, you must request
one before you can log in.
- Click Login . The configuration can be
changed at any time by clicking the Configure... button.
|

